Metallic Dress Cookies

It's FRIDAY!!!!!!!!!!
I took a little break to recover from the holidays. I need a real vacation. I thought after I had the baby my life would just go back to normal...wake up, drink coffee, get kids to school, clean house, eat lunch, clean some more, pick up kids, clean some more, cook dinner, decorate cookies, blog, clean again, then off to bed.
Not happening! It isn't going that way. I certainly didn't think adding baby #6 would make that big of a difference. What's one more? Apparently one more is like fifteen more. I'm frazzled! Don't get me wrong, he is a fantastic baby. He just ALWAYS wants to eat. Nursing is a full time job. My girls never nursed this much. Not to mention I am now a human pacifier.
My schedule goes a little more like this now.....wake up, fall back asleep, wake up, drink coffee my teenage daughter has made me (God bless her), get kids to school, nurse baby, potty train toddler (that's an all day thing), get baby down for nap, pull out my hair because toddler wakes up baby, feed myself and toddler, nurse baby, pick up kids from school, nurse baby, throw dinner together, nurse baby....blah blah blah...it's now 2am and I've not made cookies and I can't blog!!!!
I really think I got ten grey hairs last week. GREAT, now I have to squeeze in a hair appointment. Can you say stressed out?
So I took a step back to focus on the most important things in my life....my family. I had lots of snuggles with the baby. Spent time with the older kids. Still potty training the toddler....she's a bit slower than the other kids were. Things are getting into more of a system. I even got some baking and cookie decorating in! Life is good.
Georganne of
gave us a
on the first of January to make something without color. I thought...how perfect. Less colors to mix=more time to decorate! It was a win win. I'm not a fan of mixing icing....or the clean up after. I simply like to decorate cookies.
These were the cookies I came up with for the challenge.
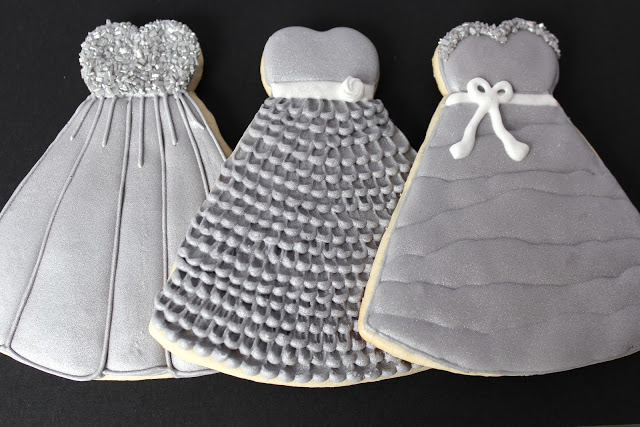
I'm going to show you how to make the dress in the middle. The dress on the right was inspired from these
by Callye of
.

1. Bake cookies and allow to cool. I pieced the dress together using a heart and large party hat cutter.
2. With a #5 tip and piping icing, pipe a row of dots across bottom of cookie. Take a small damp paintbrush and stick it in middle of dot and pull toward you.
3. Pipe a second row of dots, repeating step #2.
4. Repeat this until you reach the top dress section. Leave room for the sash.
5. Outline dress top with #2 tip and grey piping consistency icing.
6. Fill dress top with flood consistency grey icing. Let dry several hours.
7. Add a sash with white icing. I used icing that was a bit thicker than flood icing. Let dry over night.
I made rose royal icing transfers and allowed them to dry overnight. I added the rose the next morning using a dot of piping icing and glued it onto the sash.
8. For a metallic sheen, spray cookie with Wilton color mist spray in silver. Let dry.