Snowgirl Cookies

It's beginning to look a lot like Christmas........NOT. At least not here. It's rarely wintery and cold here.
It's a bit colder this morning in New Orleans, well cold for us anyway. I believe it's about 50˚ outside. I don't think I'll be going anywhere today. I'll be staying home baking. That way the house is nice and toasty.
Cold is not my thing.....but snowmen are. I love anything with a snowman on it.
Today I decided to make a girl version of the snowman....a snowgirl. Is that what you'd call the girl version?
Ahhhhh I don't have a clue. That's what I'm going to call her. A snowgirl.
I picked up the Wilton
and after I started looking at it I saw more of a snowman then Santa.....but if
has taught us anything in the world of cookie decorating, it's that cutters can be repurposed!
Ready to start?
First you'll need the following:
baked santa shaped cookies
white royal icing
blue royal icing
black royal icing
orange royal icing
#2, #3 and #1 icing tips
piping bags
petal dust in pink
small clean round paint brush

1. With light blue piping consistency royal icing, outline the hat. For top portion of hat I used a #2 tip and for the bottom of hat I used a #3 tip. I wanted the bottom to be thicker for some dimension.
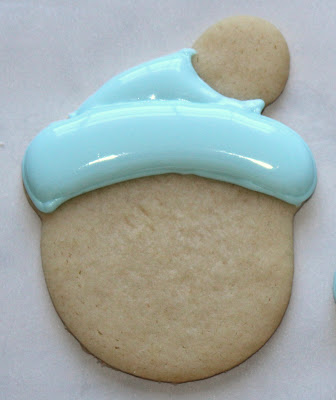
2. Fill hat with flood consistency icing and let dry several hours. Don't worry if the two sections run together during the drying time. Mine did and it's ok.
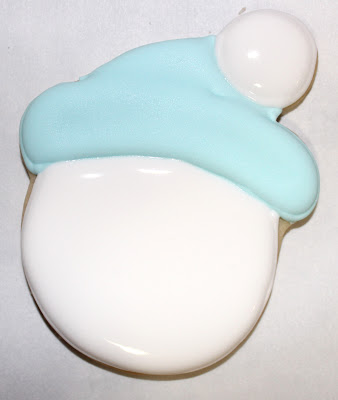
3. Outline and fill in the snowgirls face and poof on top of hat. Allow to dry for several hours.
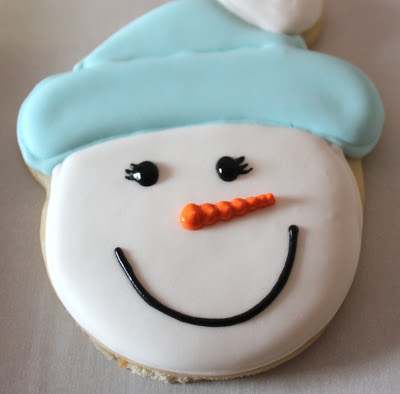
4. When white icing is dry add her face. I used a #2 tip for all the details. For the eyelashes I just drug a toothpick through the wet icing to form eyelashes. For her nose I piped dots. I started big and got smaller as I got to the tip of the nose.
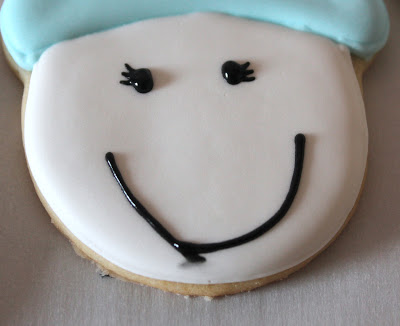
5. Fix cookie mess up....
**TIP** Mistakes are made...it happens. My icing broke when piping and left a mess. Black icing does not wipe off well......so I did a little fix and added a tongue on the cookie with the mistake.
(Shown below)
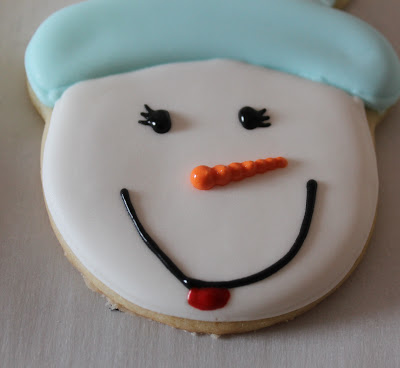
6. Cookie fixed! I just added a little blob of red icing for a tongue.
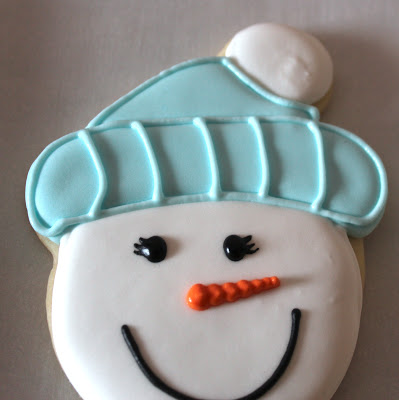
7. After the hat was dry. I outlined the hat with piping consistency royal icing and a #2 tip.

8. With a completely dry cookie, take some petal dust in pink and make some rosy cheeks with a small fluffy round paint brush.
Now go make some hot cocoa, put on some Christmas music and find some cookie cutters to repurpose.