Santa Claus Cookies

Merry Christmas!

I hope everyone had a wonderful Christmas, surrounded by the ones you love.  Our Christmas was very fun. I love seeing the children open their gifts.  There was wrapping paper everywhere and it took forever to open every gift. I still make the kids open them one at a time.  I want to be sure to see each child open their gifts. I just love every minute of it.

I learned a few things today.....

I'm in good health thanks to my check up by Doc McStuffins.

Lalaloopsy dolls are too cute. I really want to get them all....for me not my daughter.

I need a pad lock on my shoe closet....these teenage girls borrow everything.

and there is no greater joy then being a mother.

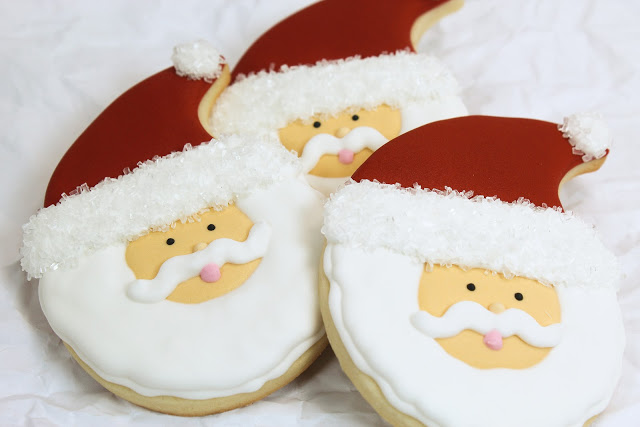
Although Christmas is pretty much over, I still have a Santa tutorial so I'm gonna share it anyway. I've been doing a lot of repurposing of cutters lately. For Santa I used this

paisley cutter

from

Ecrandal

.

1. With flesh colored royal icing make a face shape in center of cookie.

2. Outline hat shape in red royal icing.

3. Fill hat with flood consistency royal icing. Let dry.

4. Outline and fill white area on hat.

5. Outline Santa's beard with white piping icing.

6. Fill Santa's beard in with white flood icing. Let dry

7. Add eyes with black piping icing and a #1 tip

add nose with flesh colored piping icing. Let dry

8. Add Santa's mustache and a pink dot for mouth.

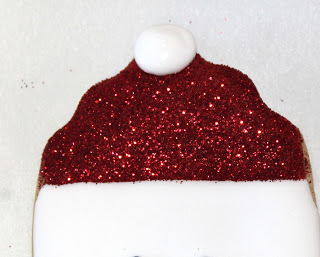
9. Add white puff to top of hat

10. While icing is still wet pour white sanding sugar  on puff. Shake off excess.

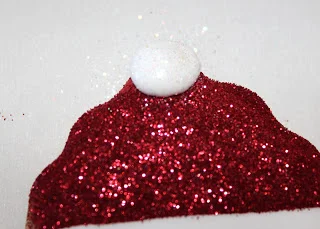
11. With 15 second icing add more white icing to brim of hat.

12. While icing is still wet sprinkle with sanding sugar and shake off excess.  Let cookie dry.

Sparkly Snowman Cookies

Ok Christmas is right around the corner and if anyone is wondering....No, my wrapping still is not completely done.

I've just been so busy.....but I totally plan to be finished tonight. I'm just glad all the online orders arrived on time. This year has been free of customer service drama. There's nothing I hate more than when I order things for my kids weeks ahead of time and it doesn't arrive because of some screw up. 

Not this year.....I've got all the presents here and I can't wait to see the children's faces light up when they open them. 

Well I've got a lot of wrapping left to do so I'm going to leave you with this snowman cookie tutorial. This was a tag design I saw

here

and just knew I had to make a cookie version. I used a tag cutter. These are very easy to make and don't take much time at all. 

1. Outline and fill bottom portion of tag cookie with white royal icing. Let dry for several hours.

2. Add snowman face and allow to completely dry. 

**TIP** make sure all the icing is completely dry before doing the next step (glittery hat) because the glitter will stick to anything wet.

3. Outline red hat with a #2 tip and red royal icing. 

4. Fill hat with flood consistency red royal icing.

5. While icing is still wet. Pour red disco dust over it. 

**TIP** for easy clean up, hold cookie over a cupcake liner when doing this. I used the foil liners because they are a bit stiffer. 

6. After the icing is dry, shake off excess glitter.

**TIP** After icing is dry, you can use a small clean paint brush to remove any stray glitter along the edge of the hat.

7. With a #3 tip and white royal icing add a poof at top of hat. You want to use thicker icing so it doesn't run off. 

8. sprinkle with rainbow disco dust.  I use a small brush that I dip in the disco dust then 

 kinda twirl the brush over the poof so that the disco dust falls onto it.

Let cookie dry and you're finished!