Decorated Corset Cookies

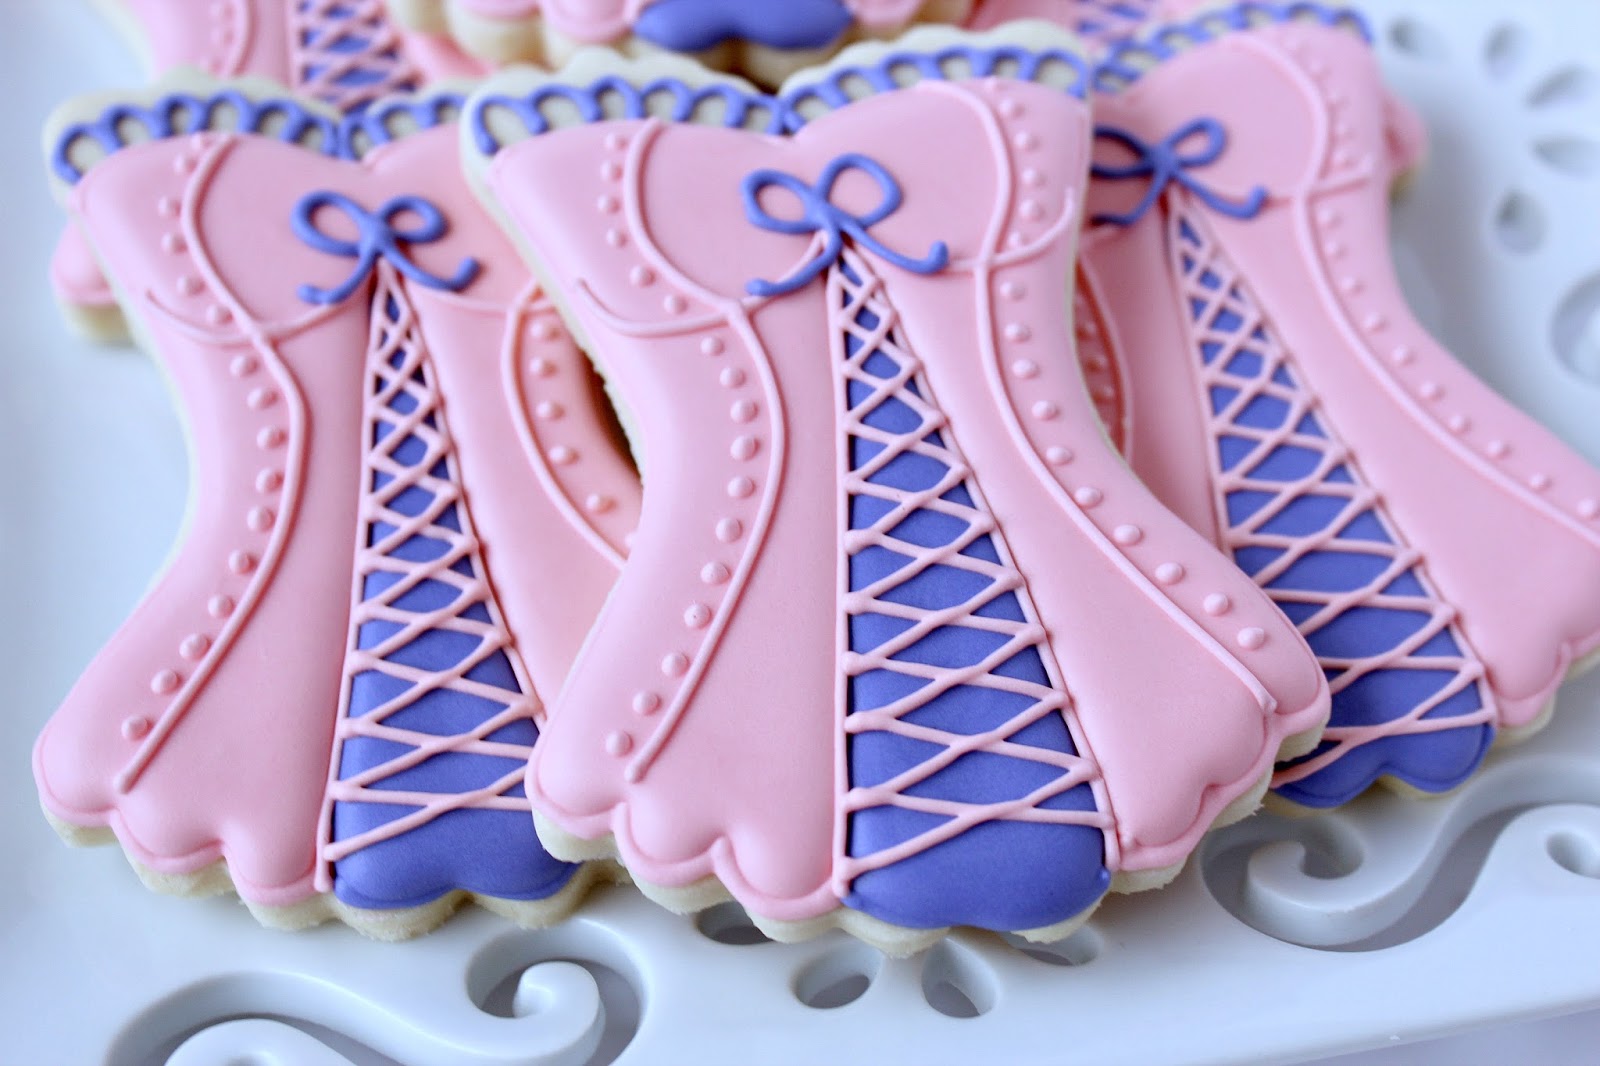
This weekend a friend of mine is having a Lingerie Party and asked me to make some corset cookies.  Since Valentine's day is just around the corner I thought I'd walk you through how I made these so you can make some too.

At first these cookies may look hard and intimidate you, but they really aren't difficult to make. You just need to break it down one step at a time. Let me show you how.

First you will need:

*corset cookie cutter (I got mine

here

)

*Royal icing in pink and purple

*piping bags

*icing tips #2 and PME 1.5

Bake corset shaped cookies and allow to cool. If you need a good cookie recipe you can get mine

here

.

I like to start decorating my cookies the day after I bake them. It helps with cookies getting splotchy from the butter in the cookies. Just place the baked cookies in an air tight container until you're ready to decorate.
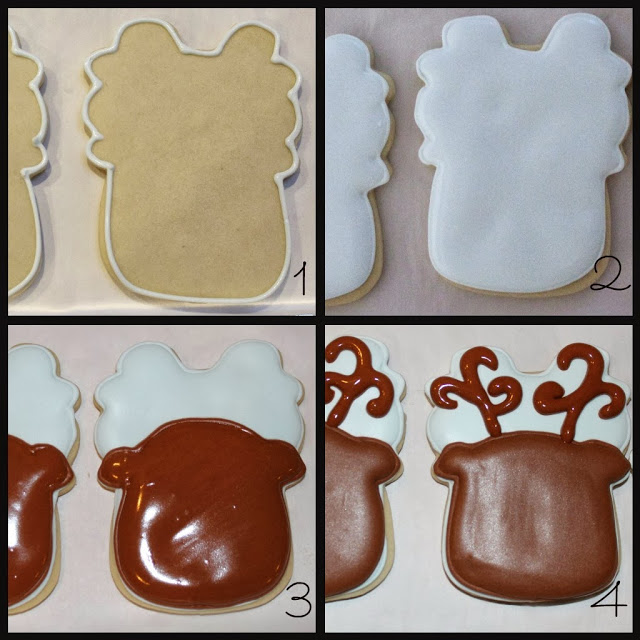
Step 1

Outline the pink portion of the cookie. I used a #2 tip to outline.  Then fill with 15ish second pink icing.

Step 2 

Outline bottom portion of purple section using a #2 tip then fill with 15ish second icing. I used a scribe to push the icing to the narrow sections. It doesn't have to be perfect, that will be covered with the outlining later.

Step 3

Using a 1.5 PME tip outline a scalloped edge at top of corset. If you don't have one you can get one

here

. Trust me, you NEED one of these. 
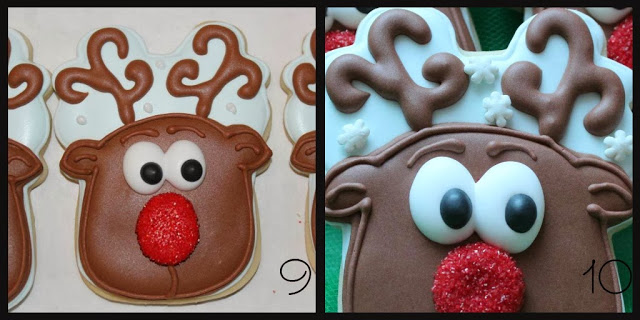
Step 4

Add details

See, it's not so hard when you break it down step by step. Just take your time, don't rush and give it a try. You'll never know what you can do unless you try. 

Decorated Rudolph Cookies

Ever have that moment when everything is going just right? You're sitting with a smile on your face because you just finished your daughter's cookies and she's going to think you're totally awesome.

Then your husband comes along and says something to totally jack up the moment!

Yeah, me too. Men do this a lot! It's not really their fault. I think when God made men, he gave women a piece of their brain and not a rib. They don't think sometimes.

It's true.

I had just finished up these Rudolph cookies for my daughter's Kindergarten class, when my husband walks in. I smile at him and show him my cookies that were made.... without using that four letter word. (Yes, sometimes decorating cookies does not bring out the best in you)

That was his moment to shine.....to say how awesome they looked....to say I was the best mom ever....anything.  He looked at me, not knowing he was about to meet his untimely death and asks, "Can you name all of Santa's reindeer?"

SERIOUSLY??? Name the reindeer? I don't even remember how many the big jolly man has, much less name them all.  I can't even call my children by the right name.

Sometimes husband's just shouldn't speak.

Just in case you need to know....there are Nine.....Dasher, Dancer, Prancer, Vixen, Comet, Cupid, Donner, Blitzen, and we all know the most famous reindeer of all..... RUDOLPH!

These cookies were sort of an accident. My

school bus cookie cutter

(Designed by

Callye, of Sweet Sugarbelle

) was just sitting on my desk....UPSIDE DOWN. All I saw was Rudolph. I even wondered where the heck did I get a reindeer face cutter. DUH, it's a school bus. Sometimes accidents are a good thing.

Supplies:

School bus cookies (baked and cooled)

Royal icing tinted light blue, brown, red, white and black

Red sanding sugar (optional)

Snowflake sprinkles (optional)

Icing bags

couplers

#2 icing tip

#1 icing tip

icing bottles

1.

With light blue piping icing and a #2 tip, outline entire cookie

2.

Fill cookie with light blue flood consistency icing and allow to dry for a few hours. 

(steps 1 and 2 can be skipped. I prefer a completely iced cookie)

3.

With brown piping icing and a #2 tip, outline Rudolph's head. Then fill with brown flood consistency icing. Let dry for an hour or so.

4.

For his antlers I used the brown flood consistency icing that I had in the icing bottle. (I flood with icing on the thicker side). Outline antlers.

5.

With white (thickish flood consistency) icing pipe on one eye on each cookie. Then come back to add a second eye. This will keep them from running into one blob of white.

6.

While the eyes are still wet add a dot of black icing on the eyes. (Same consistency as the white) Let eyes dry.

7.

After the eyes are completely dry, add a large red nose with red icing to each cookie. Then pour red sanding sugar on his nose while it is still wet. ***Make sure the eyes are completely dry before doing the nose or the sanding sugar will stick to his eyes too***

8.

You could leave Rudolph as is, but I prefer a little more detail. So I took a #1 tip and outlined him and added some details to his face, including eyebrows (not pictured)

9.

With white piping icing add dots where you want snowflake sprinkles.

10.

Attach snowflake sprinkles.