Alice in Wonderland.........

Christmas time.....umm I mean Thanksgiving. Yeah, right it’s Thanksgiving time. As someone who bakes constantly, Christmas is my favorite time of year, however I must contain myself from showing you all the Christmas things I’m designing.....I’m trying here. Not sure I’ll be able to contain myself too much longer.
So I’ll focus on something else cute......Like this dress cookie cutter from
. Its item #1702. I buy the majority of my cooper cookie cutters from them. I really love the quality and all the cute designs they have.
When my dress cutter arrived, I wasn’t really sure what I was going to do with it. I mean, I knew I was going to make a dress, but I wasn’t sure what kind. Trust me when I say this cutter has endless possibilities. I started with one idea and it took off from there. I’m in the process of designing many dresses with this cutter. I'll show you soon!
I wish I could show them to you all at once, but then you might not come back to visit me.
Okay, okay, I know you’ll be back because y’all are nice and don’t want me to be lonely here in bloggerville. Hey, it does get lonely sometimes.
The first dress I made for you is......yep, Alice in Wonderland.
Wanna know a secret? Sure you do..... Okay, I’m going to show you how I made it. I know it’s really not a secret you knew I was going to tell you, because you know I love y’all...... and my momma taught me to share.....sometimes I even listened to her....like now.
The first tip I have for you, is ......PATIENCE....that’s right, patience. You have to let the icing dry in between the layers. Which is really a pain, unless you have one of those heat guns and know how to use it properly.
I have a heat gun, and I totally HATE it. It's in the box...and I'm seriously thinking of putting it in a giveaway. SERIOUSLY!
Okay, let me show you how to make the dress.
First thing I did was outline the dress with a sky blue royal icing and tip#2. Let that dry for about 30 minutes (drying time will vary on your location) Then fill with 15 second sky blue royal icing. Allow to dry 3-4 hours.

Then outline the collar and sleeves with 15-20 second white royal icing and fill with same icing. I didn’t let the outline sit on the collar. This helped with cratering or was totally coincidence. Add a sash with a #2 tip and white royal icing. Let dry about 3 hours.

Next, you will outline and fill the top of apron and allow to completely dry.

outline and fill top of apron. Let completely dry.
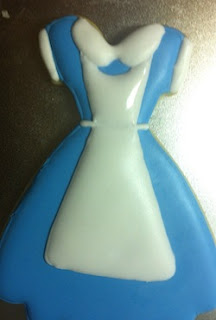
Then with a #00 tip make a scalloped edge around the entire apron with white royal icing.

Let completely dry and it's finished.

